

- Action: To Do List item B0006 – Replace section of wood that contained Australian Ships markings above the companionway entrance.
- Action: To Do List item B0007 – Remove Indra name at the mast pulpits.
- Action: To Do List item A0026 – Remove wiring and both port/starboard Hella Marine 2984 series 2 NM Navigation Lamps from masthead pulpit.
- Action: To Do List item A0027 – Route new wiring and install navigational side lights at bow spirit rails.
- Action: To Do List item A0028 – Replace Aqua Signal Series 25 Classic Stern light.
- Completed: B0006 - 16 March 2018, B0007 – 17 March 2018, A0026 – 30 March 2018, A0027 – 9 September 2018, A0028 – 15 March 2018
- Cost: $467.05
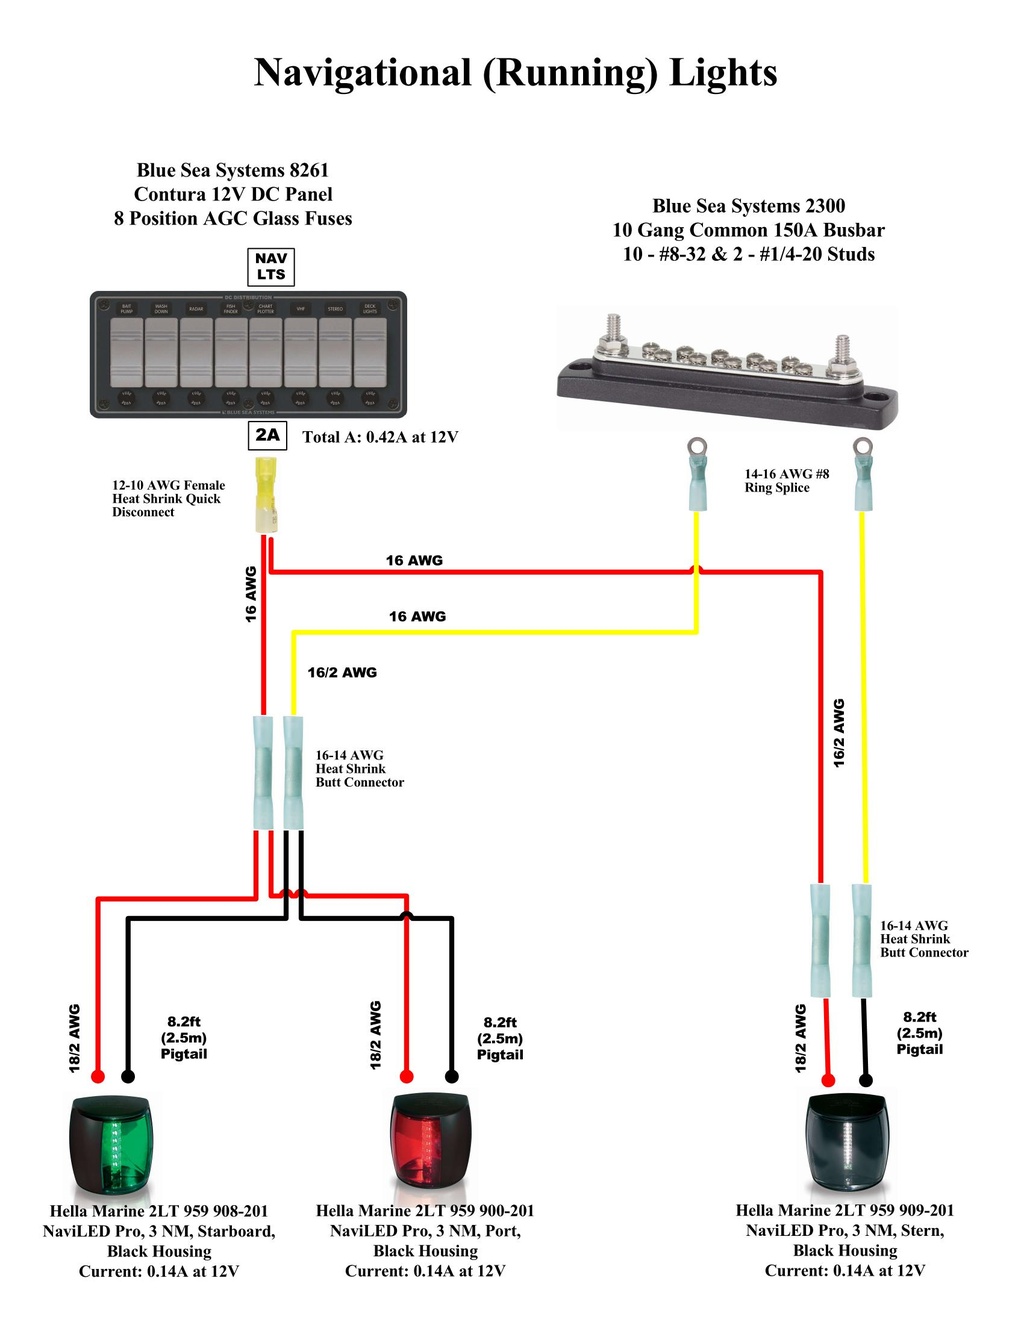
We decided that the port, starboard, and stern navigation lights would be replaced with new LED navigation lights. After research on the internet, selected and purchased Hella Marine 3 NM NaviLED PRO Navigation Lamp lights: port P/N 2LT 959 900-201 ($136.08), starboard P/N 2LT 959 908-201 ($136.08), and stern P/N 2LT 959 909-201 ($133.42). The LED power consumption was listed as 0.14 amps at 12.0 VDC for each LED light.
Downloaded the NaviLED PRO 2 or 3 NM Port, Starboard, Stern Instruction Sheet from the Hella Marine website and reviewed it - some items it stated appeared to be wrong or incomplete.
- The Instruction Sheet stated recommendations for port and starboard light placement that do not agree with the USCG Navigation Rules and Regulations Handbook and the Convention on the International Regulations for Preventing Collisions at Sea, 1972.
- The Instruction Sheet stated, "Hella recommends wire connections be soldered, and heat shrink tubing applied to seal the joint." This recommendation conflicts with ABYC E-11 paragraph 11.14.3.7 which states, "Solder shall not be the sole means of mechanical connection in any circuit."
- The Instruction Sheet stated "Lamp must be protected by a fuse rated at 5 amperes maximum". A fuse of 5 amps appears to be a bit high as the current draw is listed as only 0.14 amps. Since port, starboard, and stern navigation lights are required to be turned on/off from a single switch operation (ABYC A-16 16.6.6); the power consumption at 12.0 VDC for all three lights (0.14 amps x 3) is 0.42 amps - again a 5 ampere fuse appears to large. We will use a maximum fuse size of 2 amps for this circuit.
This issue with fuse size for the new LED lights was significant. Indra previously had the port and starboard navigation lights fused by a 15 amp circuit breaker and the stern light powered by a separate 15 amp circuit breaker on the 12 VDC circuit breaker panel - this was not in compliance with a single switch for operation of these lights per ABYC standard A-16 16.6.6. The 12 VDC circuit breaker panel did not support the small fuse requirements of less than 5 amps, so another solution was needed. We decided on a new 12 VDC AGC glass fused panel to meet these lower fuse requirements not supported by traditional magnetic latched circuit breakers as illustrated in the diagram below.
To mount the new LED lights on the bow and stern stainless rails a piece of wood would be needed. Ordered and received a 3/4" x 5" x 24" long piece of teak wood ($21.98).
On 13 March 2018, we removed the stern navigational light and deleted all its associated wiring. This deleted wiring was run along the outsides of the aft stainless steel tubing and entered the boat through a feed thru located on the aft starboard deck - this deck feed thru was leaking water into the lazarette and was deleted and sealed with epoxy.

With the teak wood, cut three pieces to mount the new navigational lights to the stainless steel tubing. These were sanded and multiple layers of Interlux Schooner Gold Varnish were applied (13-15 March).

We then mounted the new navigational lights to the bow spirit and stern stainless steel tubing (15 March).


The old Hella Marine 2984 series 2 NM Navigation Lamps port and starboard navigational lights were mounted on a wooden nameplate attached to both masthead pulpits. These lights were removed, along with the wooden nameplate (17 March).

Also took the opportunity to remove the Indra nameplate from the entryway hatch by drilling out some wood bungs and removing the screws beneath them (16 March).

The removal of the port and starboard navigational lights from the masthead pulpits highlighted the need to remove their wires routed into the cabin top area through the inside of the masthead pulpits stainless steel tubing. This would require the removal of the cabin top headliner to access the bolts/nuts that secure the masthead pulpit stainless steel tubing base, but to do this, the long teak rails on both sides of the interior cabin top would also need to be removed. The scope and magnitude of this supposedly simple task was expanding significantly - also, the removal of the cabin top headliners would reveal several other hidden issues/problems.
With the headliners removed, the old navigational light wiring was visible. The wires pulled out easily as the entry into the cabin top was a 0.5 inch hole that had no sealant applied - the visible plywood in the hole was not even coated with epoxy to prevent water intrusion into the wood.

The old navigational light wiring was butt spliced to a single 12 VDC power wire input that extended back to the 12 VDC circuit breaker panel. The navigational lights ground wires were butt spliced together to a single wire that was then "wrapped" around a exposed piece of the LED lighting return ground wire - it was then covered in electrical tape. All this defective wiring was removed and deleted.

Covered the exposed holes in the backing plates with a piece of plastic tape. From the cabin top, outside, filled the holes with epoxy mixed with silica. Then the base of the masthead pulpits were layered with butyl tape sealant and the bolts and nuts reinstalled and torqued down. The holes in the masthead pulpits stainless steel tubing where the old navigational light wiring entered the tubing was sealed closed with 3M 4200 Marine sealant.

Instead of routing the stern navigational light wiring along the exterior of the aft stainless steel tubing as was done previously (see picture below), we opted to run the wires inside the stainless steel tubing as there were entry and exit holes present (see red arrow in picture below) for this purpose.

Using 0.32-inch steel wire, we routed it aft inside the stainless steel tubing. After numerous failed attempts, we finally were able to pull the steel wire out of the entry hole in the stainless steel tubing (see red arrow in picture above). We then attached the electrical wire cable from the new Hella Marine 3 NM NaviLED PRO Stern Navigation Light to the 0.32-inch steel wire and gently pulled the other end of the steel wire back out of the stainless steel tubing. We had successfully routed the stern navigational light wiring through the stainless steel tubing.
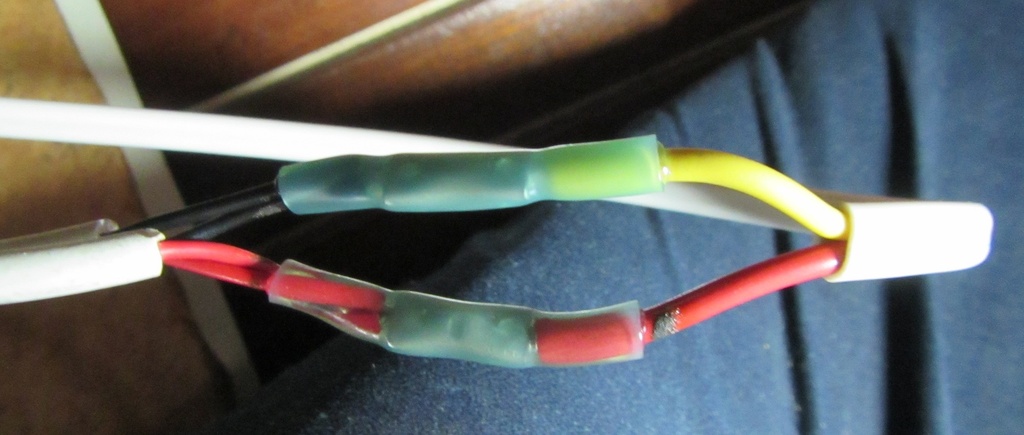
Next we routed 16/2 AWG duplex sheathed electrical cable ($8.00) from the navigational desk, where the new 12 VDC AGC glass fused panel was located, to the aft area below the starboard cockpit. We drilled a hole in the aft starboard cockpit exterior sidewall and installed a Blue Sea Systems #1001 CableClam ($15.99) to weather proof the passage of the electrical cable. The 16/2 AWG duplex electrical cable was joined to the stern navigational light wiring with inline butt splices ($2.00). This connection point was then wrapped with black electrical tape and secured with tie-straps.

The routing of the port and starboard navigational light wiring was desired to be internal to the bow spirit stainless steel tubing and at its base pass through the forward deck. We removed the headliners in the forward berth to reveal the backing plates and bow spirit stainless steel tubing mount bolts/nuts. It was not a surprise to find the old unused wiring still present - this will be removed and deleted.

When we returned again to Indra, mid August 2018, we removed the bowsprit stainless steel rails to the ground to enable routing electrical wires for the navigation lights (21 August).
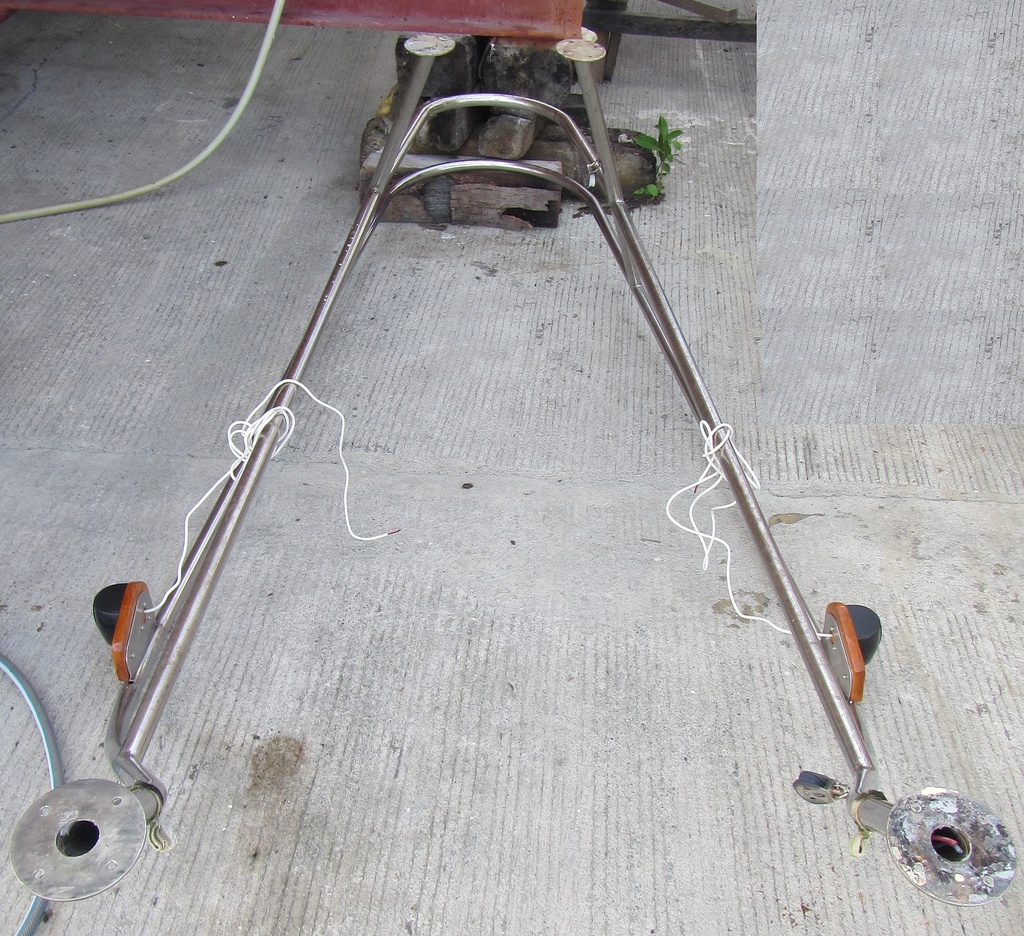
We removed the old non-marine rated wiring from inside the stainless steel tubing and discovered it had a inline splice on both wires to extend their length. It is usually common sense and a good practice to never install a wire splice in an area with restricted access. Using 0.32-inch steel wire, we routed it inside the stainless steel tubing and were able to fish it out the small hole by the base of the navigation lights. We then attached the electrical wire cable from the new Hella Marine 3 NM NaviLED PRO Navigation Lights to the 0.32-inch steel wire and gently pulled it back out of the stainless steel tubing. We had successfully routed the navigational light wiring through the bow stainless steel tubing.

Secured the wire navigational light wiring with a small nylon clamp. Next since this fixture was already on the ground and in the shade, used the opportunity to remove corrosion and polish the stainless steel rails with Autosol metal polish.

Routed 16/2 AWG duplex sheathed electrical cable ($12.00) from the navigational desk, where the new 12 VDC AGC glass fused panel was located, to the area in front of the v-berth - the previous location of the chain locker (31 August). Both the bow port and starboard navigational light wiring was connected by splices ($0.50) to the 16/2 AWG electrical cable (3 September). The wiring routed in front of the v-berth was secured with clamps and the wire splice was secured and positioned in front and below the old chain locker access door.
The 16/2 AWG electrical cable from both the bow and stern navigation lights was connected to the new 12 VDC AGC glass fused panel at the navigational desk with a 2 amp fuse for circuit protection ($1.00 for wire terminals & fuse).
Checked the navigation (running) lights and they worked a-ok (9 September)!!!